Order Fulfillment
All in one place to pick pack and ship orders within SKUSavvy. Learn how to create batches of orders to ship faster.
Order Management
Create Batches
Learn everything you need to know about creating order batches
Order Management
Understand the ways SKUSavvy helps with order management
Pick to Tote
Maximize efficiency and organization with pick to tote
Fulfill a Single Order
You can easily fulfill a single order by finding the order within SKUSavvy, clicking on it then tap 'Fulfill'.

1) Enter filters for the orders you want to view: text/SKU, creation date, status, tags, source
2) View status and progress of the order, click to view the order
3) Click or tap on underlined text to view details on that element. In the image above tapping on the customer name will go straight to that customer properties
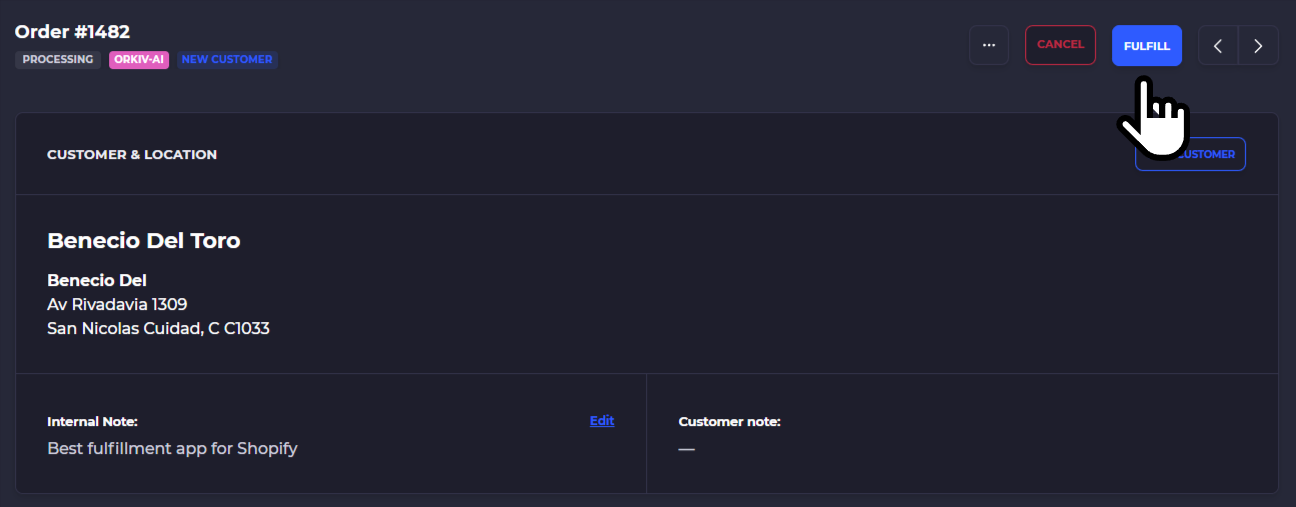
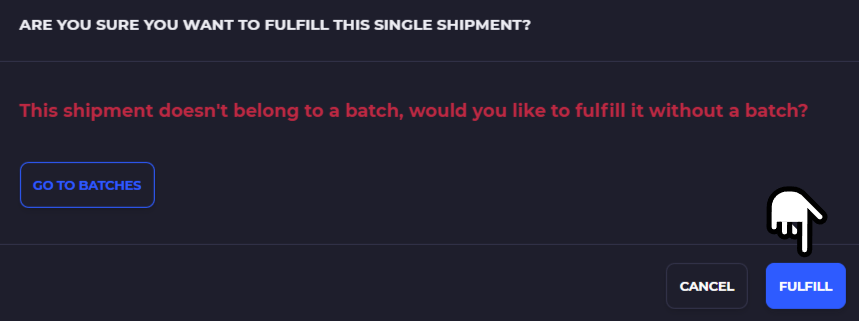
Next you'll see a popup asking if you want to create a batch for the single order, tap 'Fulfill' again. You can optionally just go to batches and create a new batch of orders instead of creating a single order batch.
Order Picking
Within each warehouse, orders are assembled into batches. These are sorted to put like products together into a similar batch of orders. During this, SKUSavvy creates a smart wave pattern of a pick path through the warehouse so you have a visual pick path that can be followed.
Pick Screen - No Scans Required
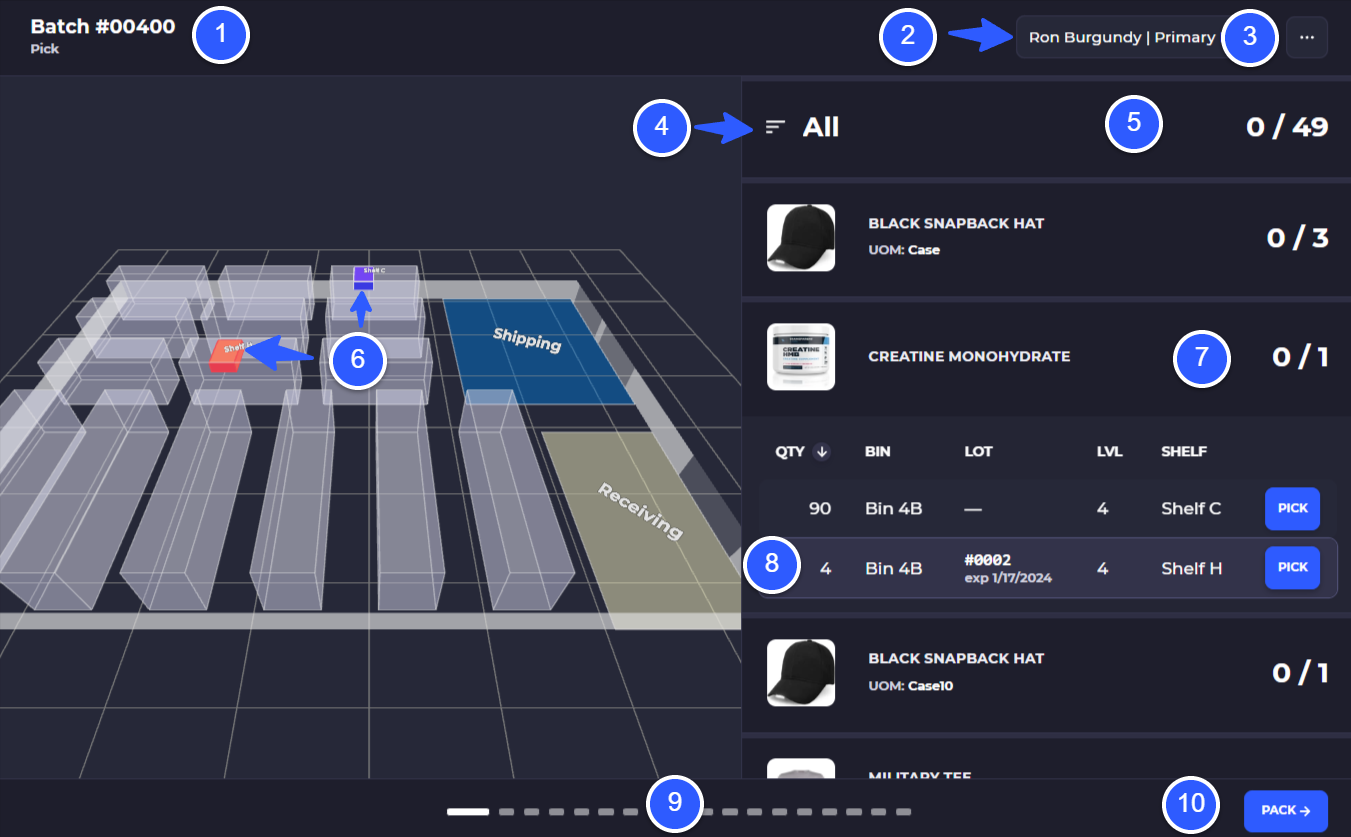
1) Batch ID
2) The current employee assigned to the batch, switch in real-time to hand off the order
4) Batch settings
4) Filter orders to show by their pick status - picked, not picked
5) Total number of items in the batch, click to show all bins holding inventory needed to complete the batch
6) Bin location(s) of the current item in the pick list
7) Number of units needed to complete the batch
8) Shelf, level, and bins the item is located in along with the current quantity in the bin and any lot/expiration dates associated. Tap 'Pick' to accept the pick (only shows if there are no scan settings turned on)
9) Pagination showing all orders within the pick batch
10) Move on to the fulfillment and shipping part of the batch
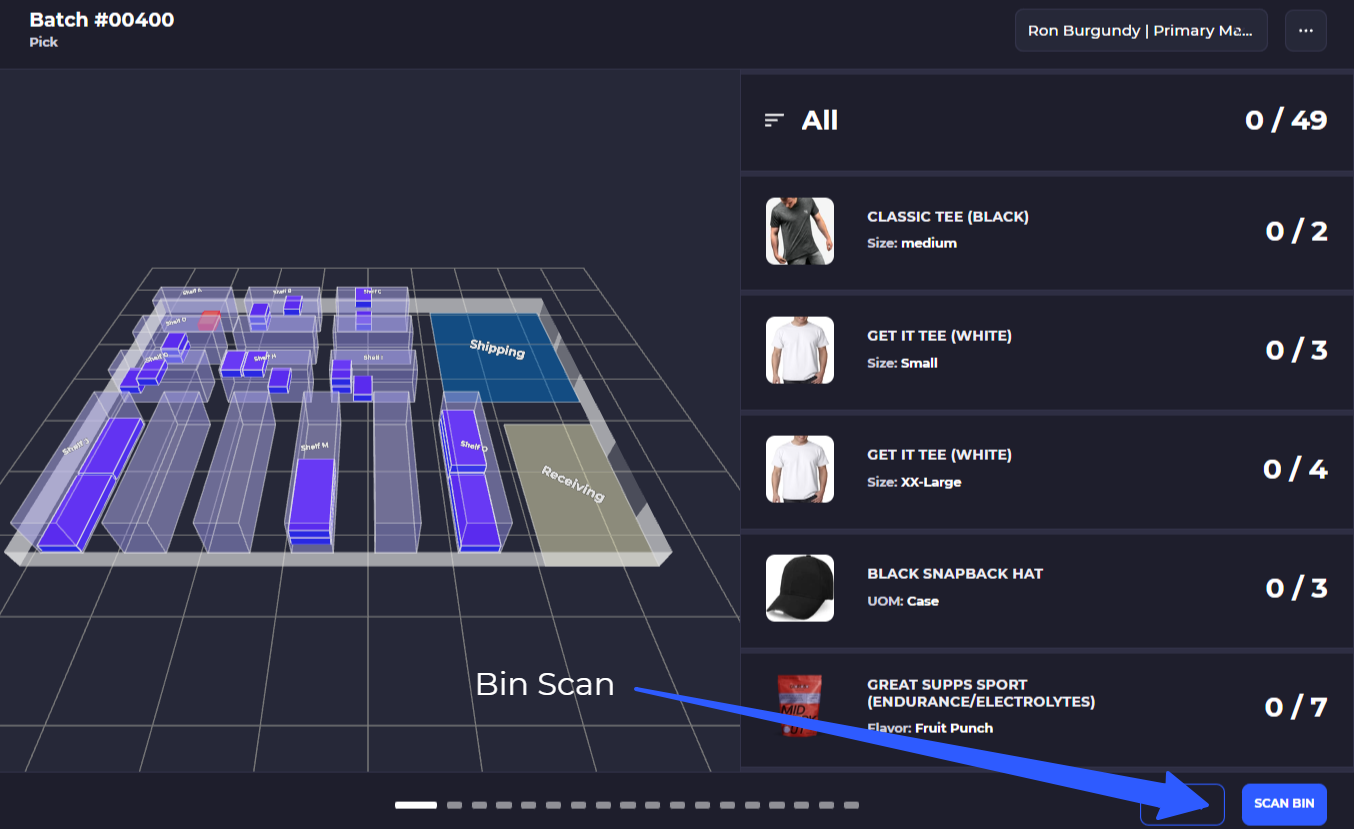
Pick Screen - Bin and Item Scan Required
Batch Settings

Batch settings enable you to customize the way your batches will be set up and the workflow for fulfillment steps.
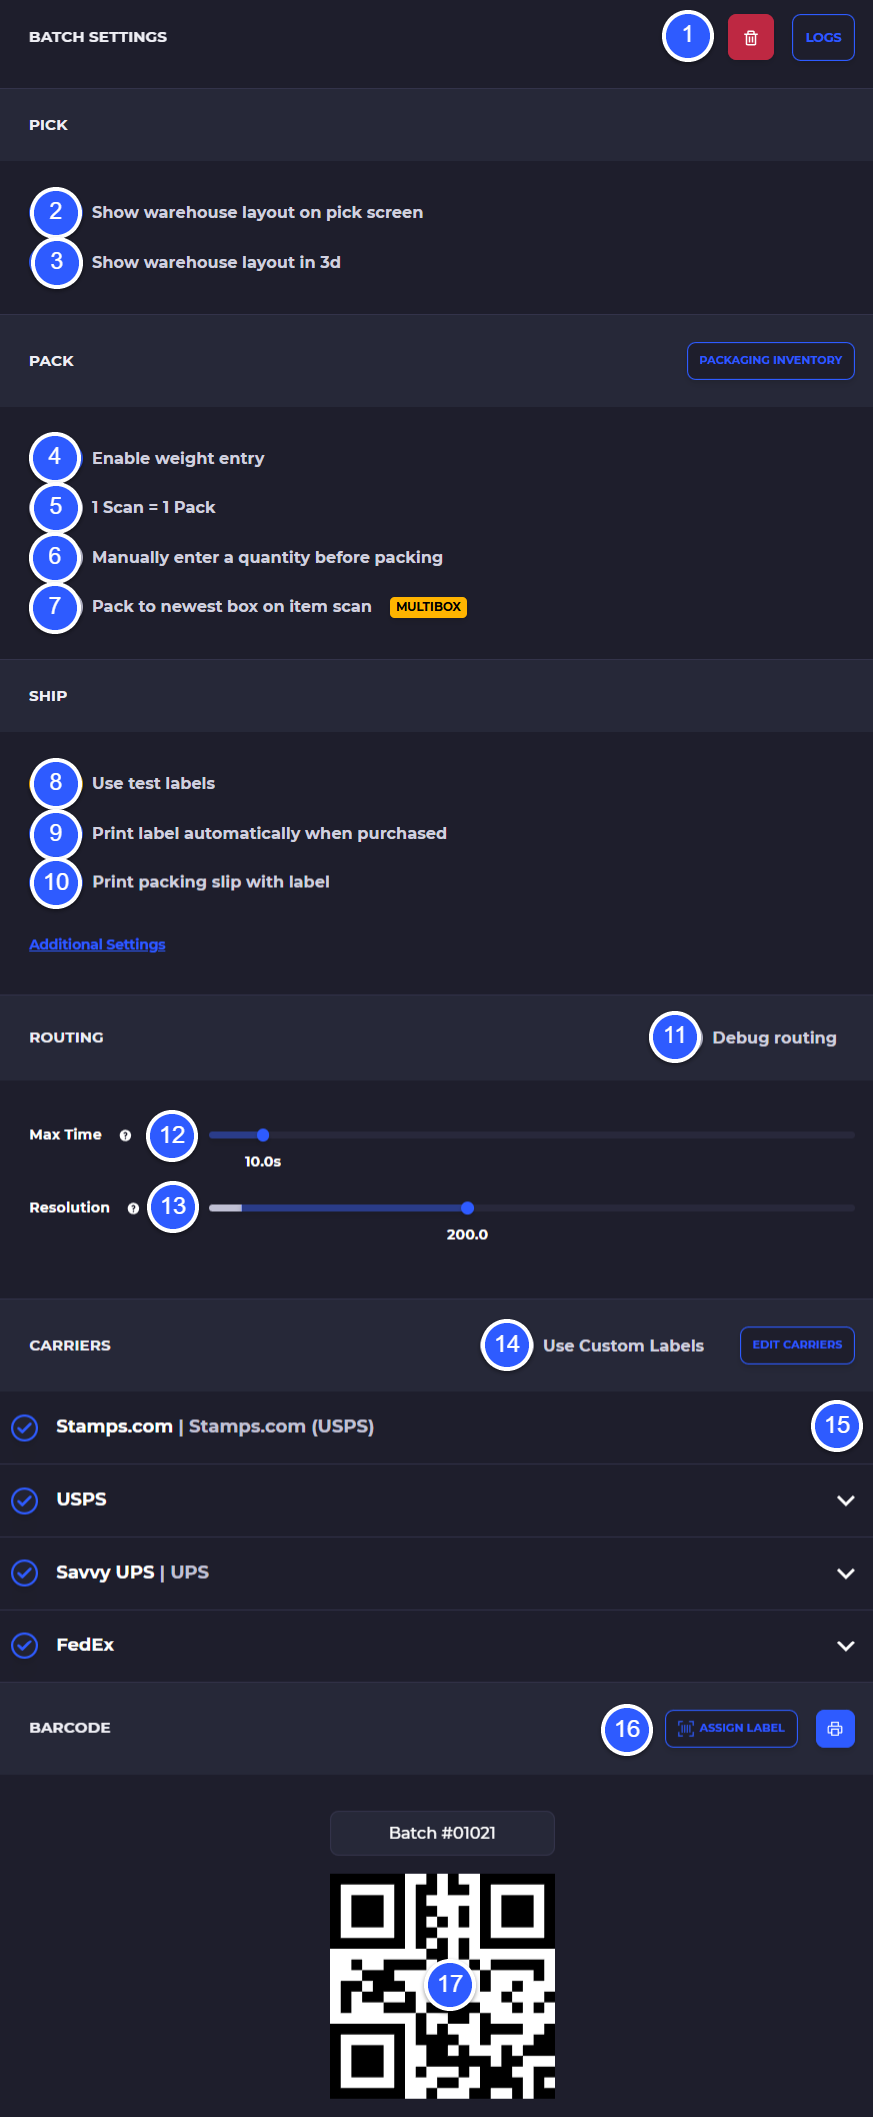
1) Delete a batch (all products must be unpacked and unpicked with no shipment labels created)
1.a) View the logs for the batch
2) Option to turn off the warehouse layout on the pick screen
3) Option to switch your warehouse map between 1D and 3D views
4) Enable weight entry override during fulfillment
5) Turn on 1 scan = 1 pack so every item will need to be scanned to pack the order
6) Manual entry of quantity before packing which will popup a dialog with the item and quantity being packed
7) Pack to the newest box automatically via barcode scan in a multi-box shipment
8) Use test labels - this will print default test USPS labels from the included Stamps.com test account created automatically when you sign up
9) Print label automatically - your shipping label will print immediately after purchasing the label instead of requiring a second click to print
10) Print packing slip with shipping label
11) Debug routing shows a preview of the route created for the batch with guided pick path and each stop shown
12) Max time to allow SKUSavvy to create the most optimized route. A longer route will produce better routes though 6 seconds should be max time for 50 or less items
13) Resolution is the size of the layout being used in the routing engine, smaller is better however with complex layout and small walkways you may want to consider using a larger number
14) Use custom labels - this will substitute carrier labels with your own custom label created with the label maker in your templates
15) Turn on/off specific carriers to be used when pulling rates for shipping. Expand the carrier to view individual services available from the carrier (home delivery, 2-day, international etc.)
16) Assign and print your own barcode the corresponds to the batch of orders
17) Batch barcode that can be printed out and scanned to bring a user directly back to the batch of orders (also available from the batch list)
Order Fulfillment
Once all items have been picked, tap on 'Pack' to fulfill each order in the batch
On the next screen, you will see the shipping address, and contents of the first order within the batch. You will also notice a packaging selection. If the warehouse has available packaging and your products have dimensions SKUSavvy will attempt to suggest the correct package size. From this screen each item in the order can be scanned or tapped to confirm and added to the shipment.
If you haven't added packaging and are not showing any packaging options at fulfillment follow the directions below:
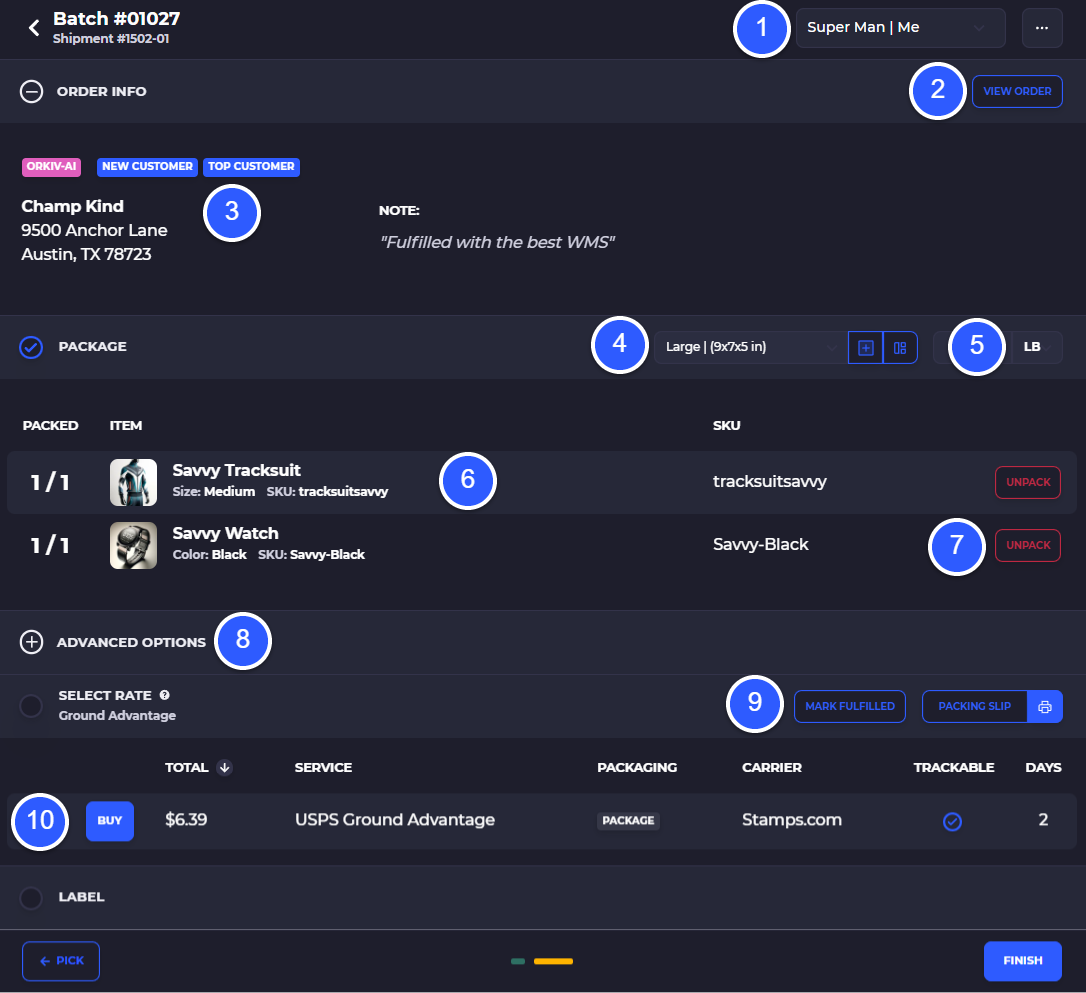
1) View and reassign the staff member assigned to this order batch
2)View the order details, resync the order, or make edits to the order
3) Order tags, shipping address information and order notes. Click on the customer address to make changes directly within fulfillment
4) Package size selection (auto-selects when dimensions have been entered for all items within the order) as well as 3D palletization visual of the order packaging by clicking on the blue tile icon
4.a) You can also add a new box to the shipment for multi-box shipping using a single tracking label
5) Weight of the order - enter a new weight to override system weight
6) Items and quantity required to fulfill the complete order (note: if you have not picked the items they cannot be packaged and the item will be grayed out)
7) You can unpick an item to the batch or directly back to a bin if the order has been edited and stock is no longer needed
8) Advanced shipping options: terms of trade, scheduled ship dates, delivery confirmation type
9) Manually mark the shipment fulfilled and optionally provide your own external tracking number which will update back to Shopify
10) Purchase the label and tap to view shipping costs included
For each order shipment tap or scan the items to add them to the fulfillment. Once all items have been packaged, SKUSavvy will show the shipping services available.
1) Showing fully packaged items in the order (1/1)
2) Option to unpack items that were accidentally added to the order

Different package sizes will offer different choices in the available shipping services.
Fulfillment Options
Split Order Fulfillment
Enables you to split an order into multiple shipments so that you can send out part of the order then revisit later to send out the rest of the order for cases you are shipping to different addresses, have backordered quantity, or need to make adjustments to the second part of the order.
Order Edits
Edit your orders directly within SKUSavvy or on Shopify and they will be reflected immediately all the way up and until you produce a shipping label.
Shipment Cancellations
You can cancel order shipments and return inventory back to bin locations following this workflow. Order shipment cancellation is different from an order cancellation which will need to happen on Shopify.
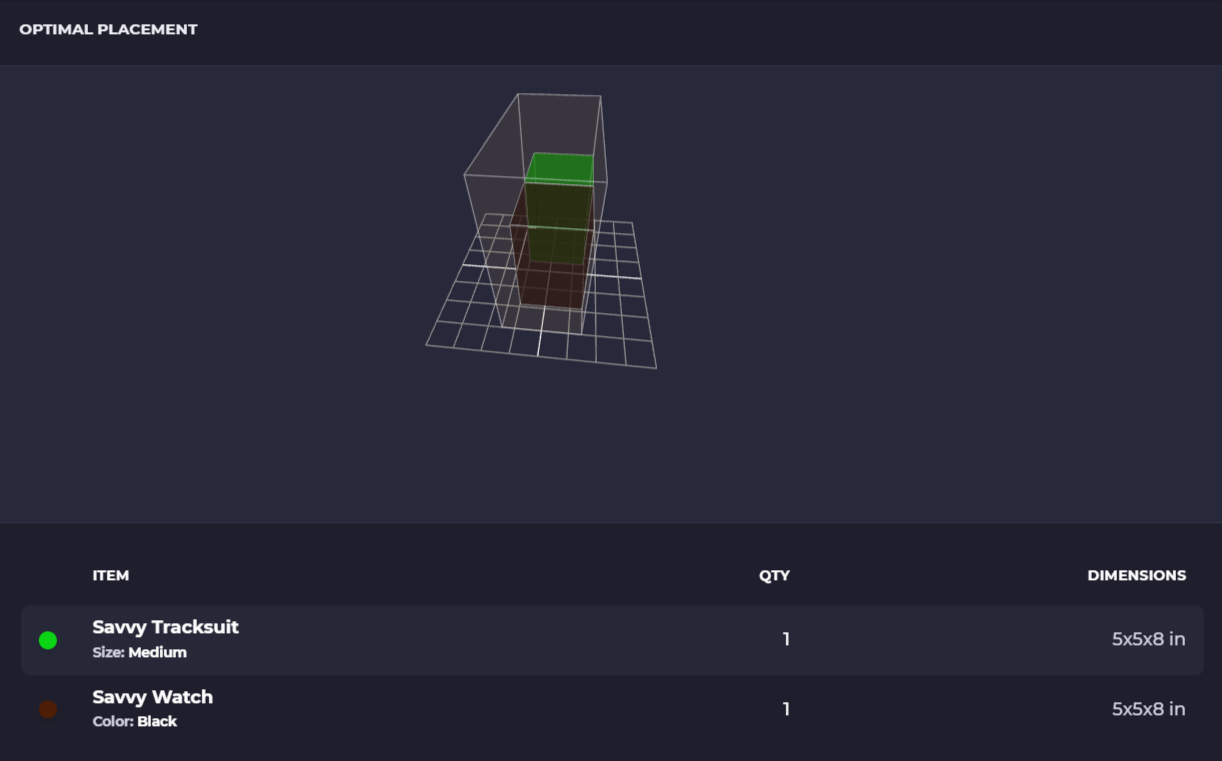
Palletization
During the fulfillment process SKUSavvy provides a 3D visual of the best way to package the contents of an order. Click on the icon in SKUSavvy to view this:

Shipping Orders
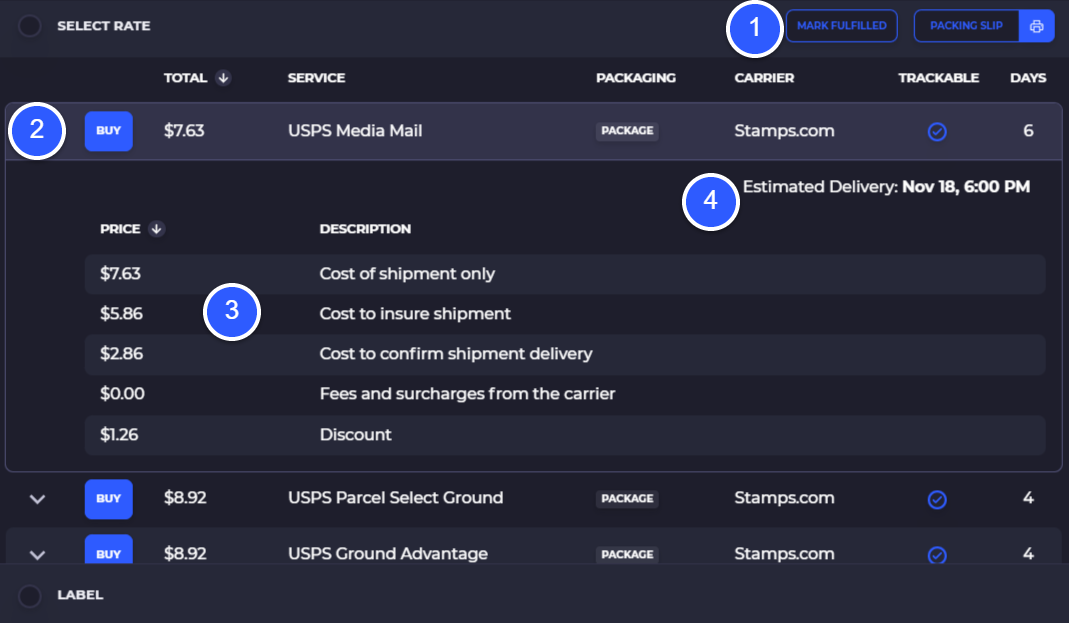
Once an order has been packaged, SKUSavvy will use your carrier accounts to pull rates for your account to show in the window that appears. If you are getting an error, it is likely because you don't have a carrier account connected, or your carrier account does not have funds.
1) Mark an order as fulfilled without purchasing a shipping label (must have this option turned on within the company property settings)
1.a) Print a packing slip for the order
2) Pull down the shipping options and view the price, service, carrier, whether it is trackable or not, and the delivery time schedule. Press 'Buy' to purchase the label and make it available for printing
3) Shipping options available for the shipment
4) Estimated delivery date
Setup shipping automation to have SKUSavvy suggest the same shipping as your customer has paid.
Advanced Shipping Options
These options enable you to select various pickup and delivery methods for a given carrier. Click on the 'Advanced Options' to expand this out.
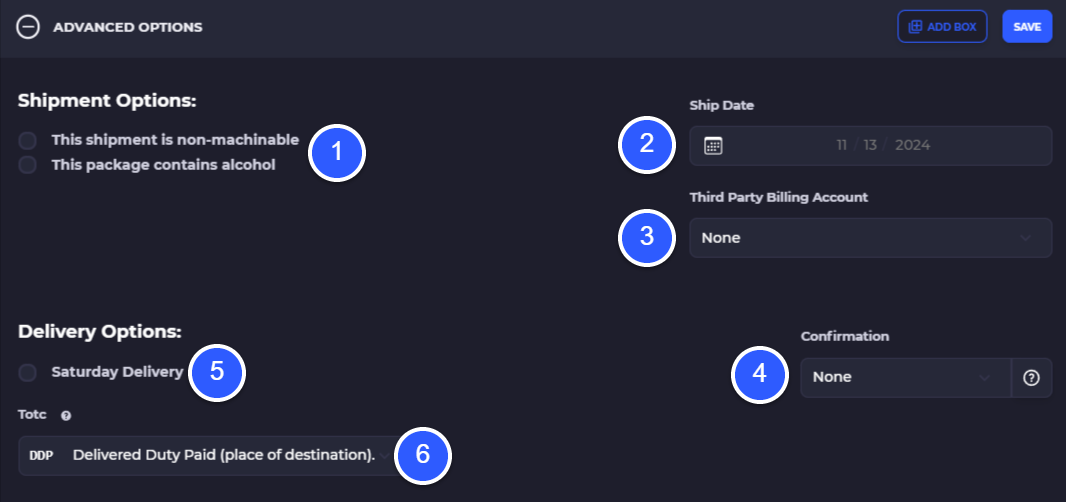
1) Shipment options to indicate a shipment is non machinable
1.a) The package contains alcohol
2) Select a date in the future you will plan to ship
3) Indicate this shipment will use a 3rd party billing account and select a 3rd party account. This must be added to your carrier within SKUSavvy first
4) Delivery confirmation type such as delivery, signature, adult signature, delivery signature, delivery mailed
5) Saturday delivery option
6) If shipping internationally you should plan to select a terms of trade code
Shipping Label Printing
After you've made a shipping service selection SKUSavvy will automatically purchase the label and generate the label for printing. You can print directly within the browser for USB connected printers, or through Airprint for mobile fulfillment stations setup through iPad or iPhone devices.
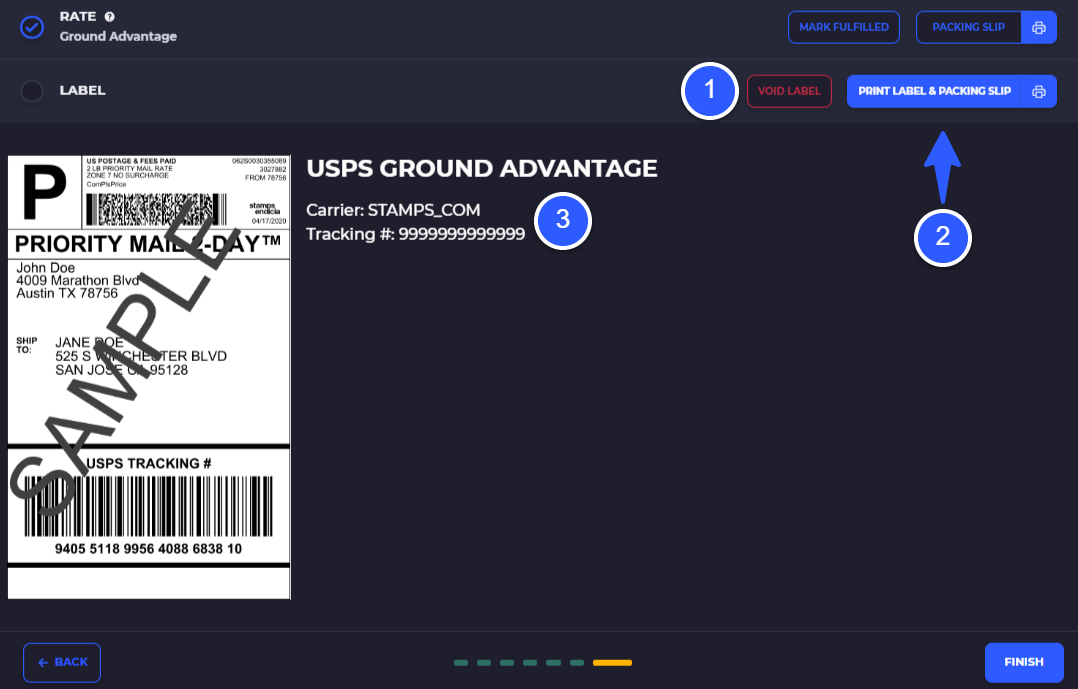
1) Void the label and purchase a new label
2) Print the label
3) Label and tracking information
Buy Online Pickup In-Store
If you frequently accept orders online for pickup in store (BOPIS) this workflow will help your staff navigate this oftentimes complicated task when there are many orders being placed for pickup.
Barcode Actions
You can utilize SKUSavvy to create barcodes that when scanned with a hardware scanner perform some action during fulfillment. These actions can be any of the following:
ACTION: Move to next step in a batch
ACTION: Move to previous step in a batch
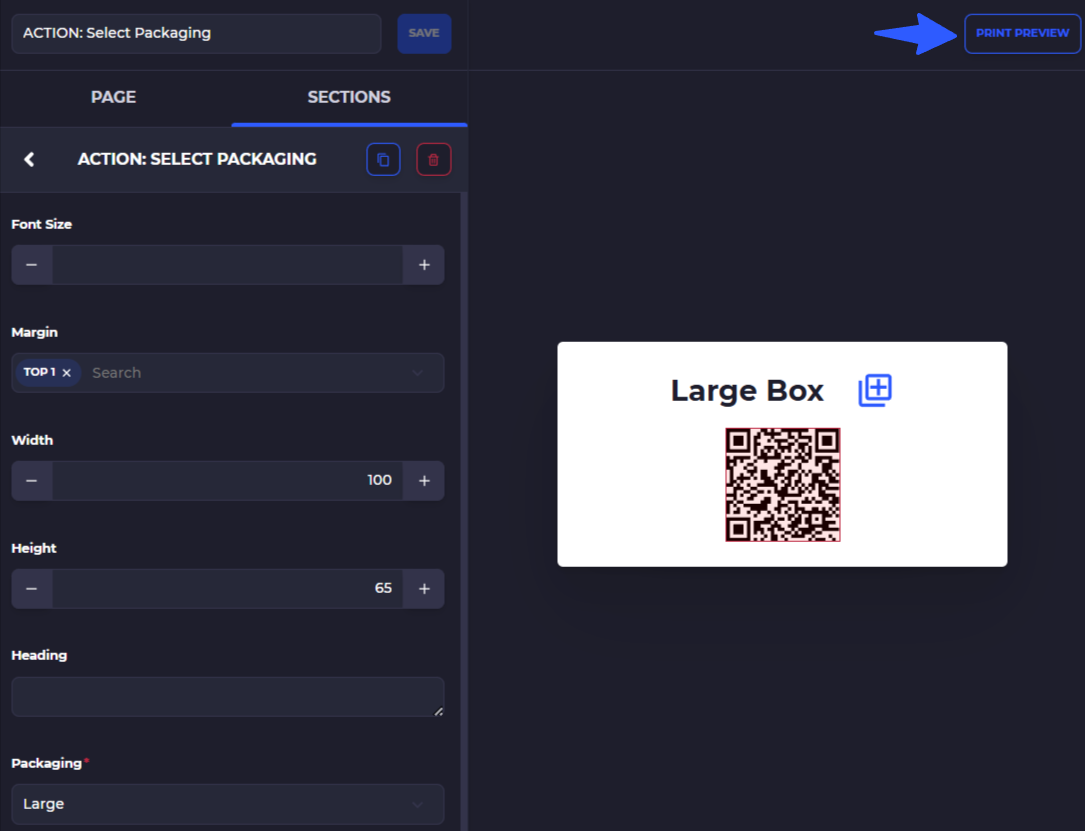
ACTION: Select box size
ACTION: Add new box to the shipment
ACTION: Split shipment
ACTION: Print label
ACTION: Print packing slip
Step 1: Create Action Templates
Go into the templates section of SKUSavvy and create the new barcode actions. You can create your own from scratch, or use the pre-existing templates and make a copy. Consult the guide on using our barcode creator suite.
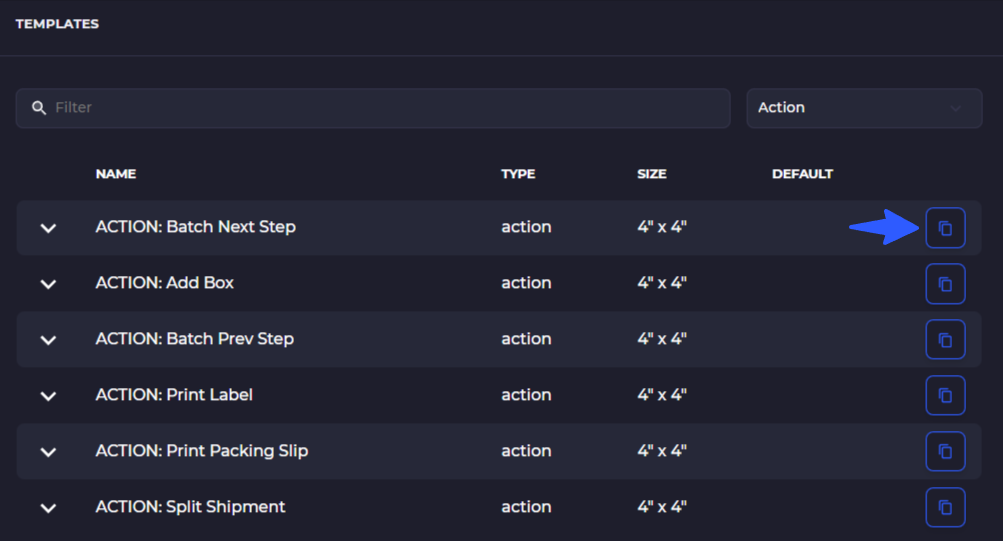
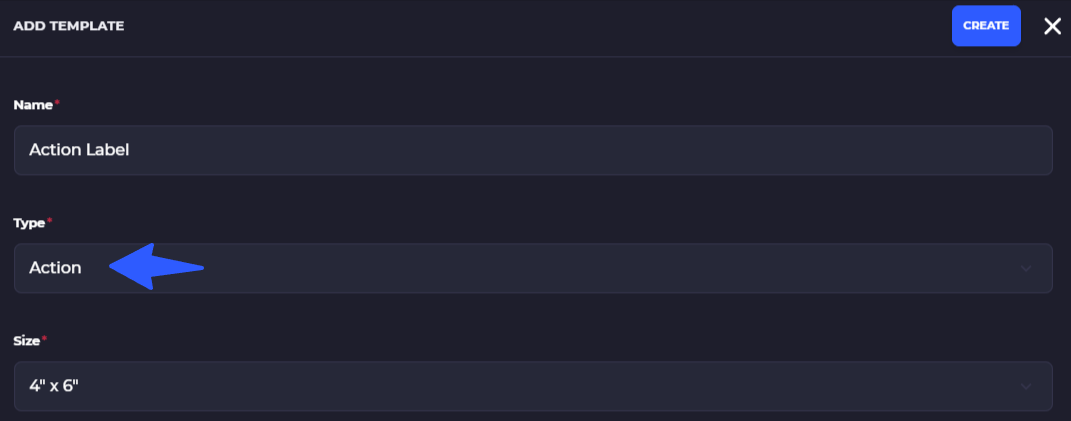
Step 2: Print Action Barcodes
From the template creator, select your template and tap print preview to print the template out.
Step 3: Scan Action
With your custom action label printed out, hardware scanner connected you can go into any order pick batch and start scanning the various actions to see how they perform to limit the number of taps.
You must have a hardware scanner connected to utilize action barcodes, and you must be within a pick batch for scan actions to be recognized
FAQs
Why is there no inventory to pick?
If you've just signed up for SKUSavvy and connected Shopify, the inventory from your Shopify store is not available to pick until that stock has been placed into a bin location on SKUSavvy
How do I pack the order?
First make sure you have picked all products in the order shipment, then simply tap on the item or scan the item to indicate the stock has made it into your packaging
Why are shipping rates not showing?
To get shipping rates make sure these requirements are met:
Carrier is connected, or test labels are turned on during fulfillment
You have added at least one packaging material and given it stock if packaging inventory is being tracked
Ensure all warehouse properties are filled out: phone, email, valid address
Ensure stock has been picked from a SKUSavvy bin and packed into your box
For international orders plan to have all tax information filled out, and all harmonized codes assigned to items being shipped
What should I do if I don't have barcodes?
Turn off all requirements for barcode scans within the configuration options in your account which will enable you to simply tap to indicate picks, packs, cycle counts, etc.