Import Data into SKUSavvy
Bring your data into SKUSavvy seamlessly with CSV, JSON, or Excel data.
Inventory Import
Using the inventory import you can align bin lcoations, serial numbers, quantities, and more. Below are the data types you can import into SKUSavvy inventory as well as how to set this up for a successful import. It important to keep in mind that SKUSavvy needs to have some unique identifier for the bin, and the item, this could be the bin name, bin ID, bin barcode, or the combination of bin name, shelf name, and bin level. The product unique identifier is typically SKU.

Data Fields
Bin ID (optional) - the SKUSavvy ID for the bin, can be located in the URL of a bin detail page or via the API
Bin Name (required) - the name of th ebin to import inventory into
Bin Barcode (optional) - the barcode for the bin, this can be updated with your existing barcode if you have one, it can also be used as the unique identifier for the bin if you already created a map in SKUSavvy and have the bin barcodes
Shelf Name (optional) - the shelf name containing other bins
SKU (required) - unique identifier for the product inventory to import
Serial (optional) - serial numbers for your stock, one serial number can only be located in one bin
Variant ID (optional) - this can serve as a unique identifier for the product variant to import. Available from the URL of the variant or the SKUSavvy API
Variant Barcode (optional) - barcode for the product variant to import. Can serve as the unique identifier for the product to import
Quantity (required) - the quantity of a variant to import, positioned at the corresponding bin location
Step 1: Upload and Map Columns
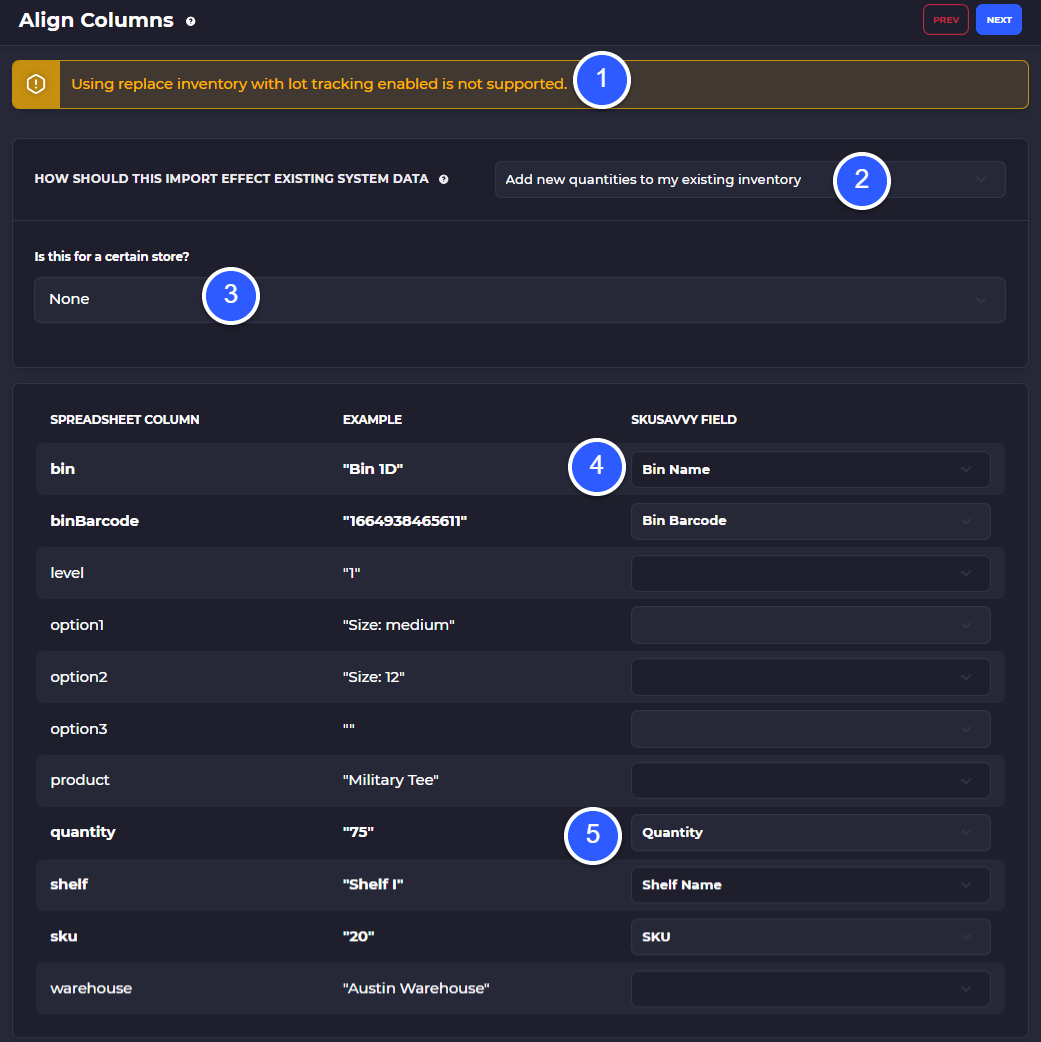
1) Currently lot imports are not supported, this is a warning showing this
2) Select the type of inventory override you want to perform: add new quantities to existing inventory, replace existing inventory with new inventory, or replace all inventory with the inventory on the import
3) Select a specific Shopify store to import inventory into
4) Select the matching SKUSavvy field for your existing spreadsheet column
5) Make sure to select all the required columns for matching
Step 2: Confirm Data Import and Assign Missing Data
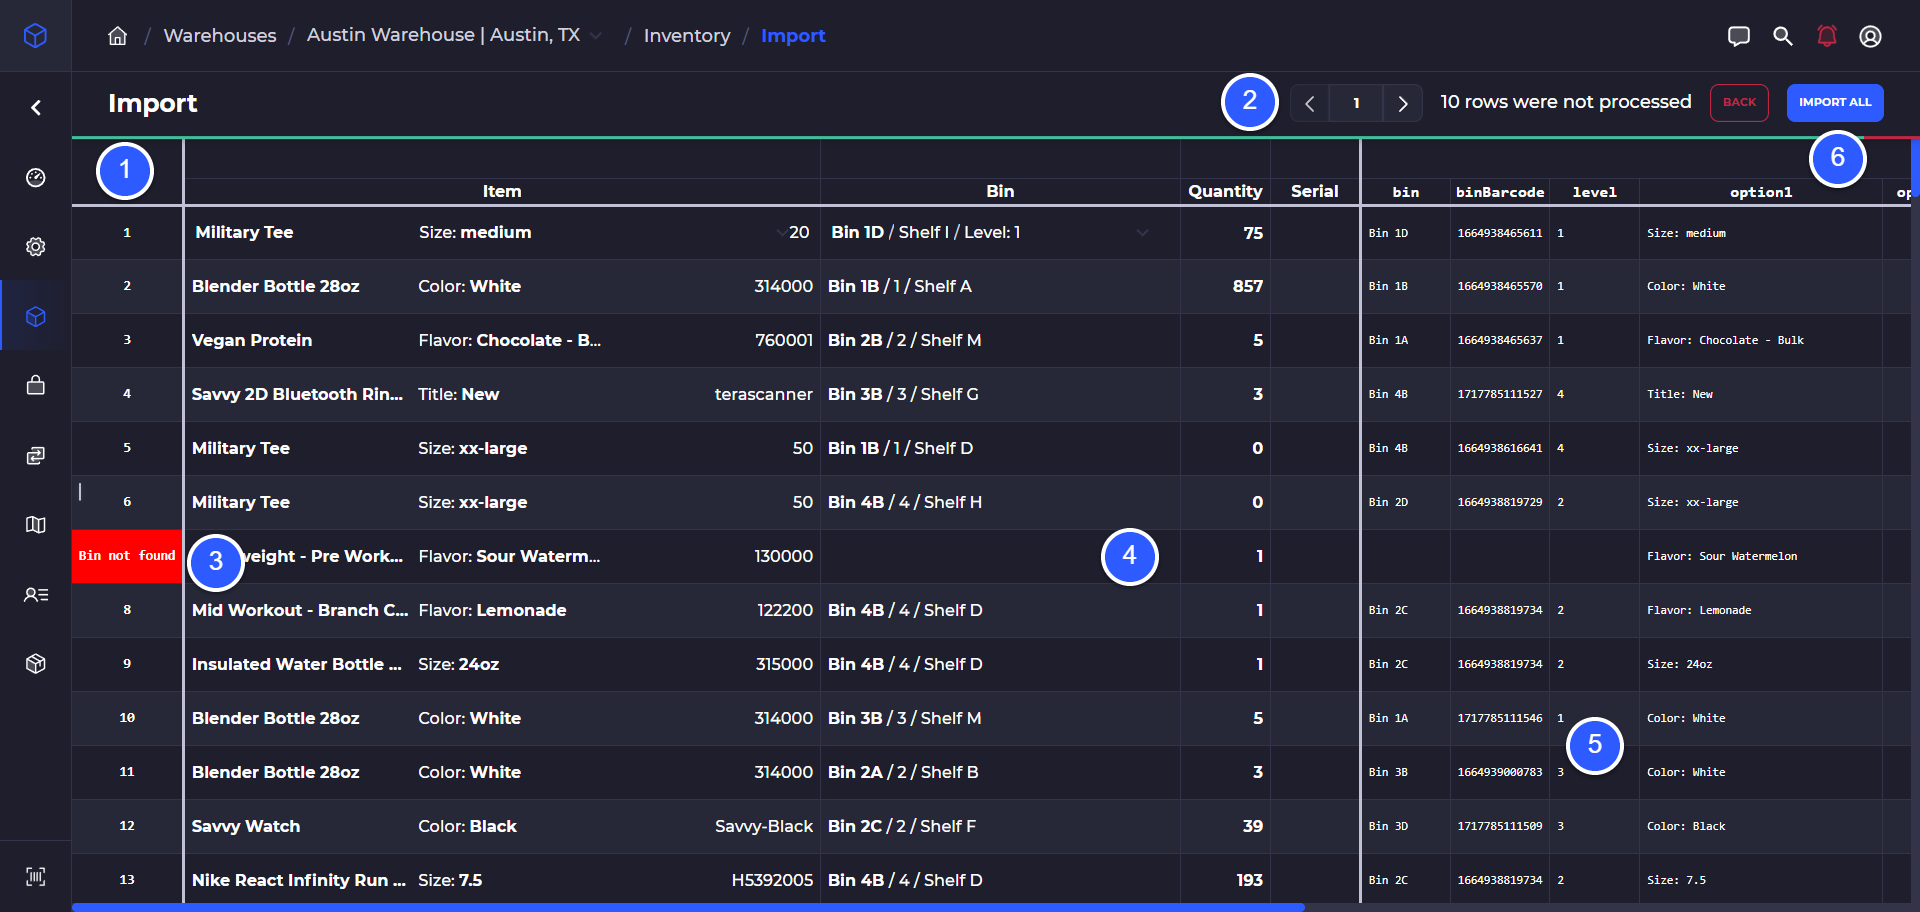
1) Row number with errors - Import data is shown as the exact rows from your spreadsheet, and the matching data within SKUSavvy
2) View pages of your import and see the number of rows that did not match
3) Red row numbers indicate there is missing matching data that you will need to update in your spreadsheet or manually align in the import tool
4) Manually align missing data by selecting the cell in the import tool
5) View raw data from your spreadsheet
6) Tap 'Import All' to import matching rows
Cost Import
Using this import will enable you to update your cost levels across different vendors. You will need to have a unique identifier for products such as SKU, and for the vendor the cost should be updated on. SKUSavvy will help you align the data to your vendors and you can manually select data to align within the import module.

Note: costs are held on the vendor and a single variant vcan have many vendors at different costs.
Data Fields
Vendor ID (optional) - this comes from the URL in the vendor detail page on SKUSavvy or from the SKUSavvy API. You can use this as a unique value to import to
Vendor Name (optional) - this is the vendor name assocaited with the cost level you want to import
SKU (required) - this is the unique value used to correlate your variant with the vendor and cost level
Variant Barcode (optional) - the barcode associated with your variant
Vendor SKU (optional) - update the vendor specific SKU for the item as part of the import, also available to show on the PO template or during PO creation
Unit Cost (required) - cost of the item for this vendor, can accept 3 decimal places. Costs will be shown in pennies
Step Count (optional) - if your vendor rquires you to purchase in increments of a certain quantity you can use this to set those rules. For instance if the vendor requires you to purchase in increments of 10, this could be set and you would only be able to purchase 10, 20, 30, 40, etc. units at a time
Note (optional) - set a specific note on the variant which will show during the PO creation
Step 1: Import Data and Map Fields
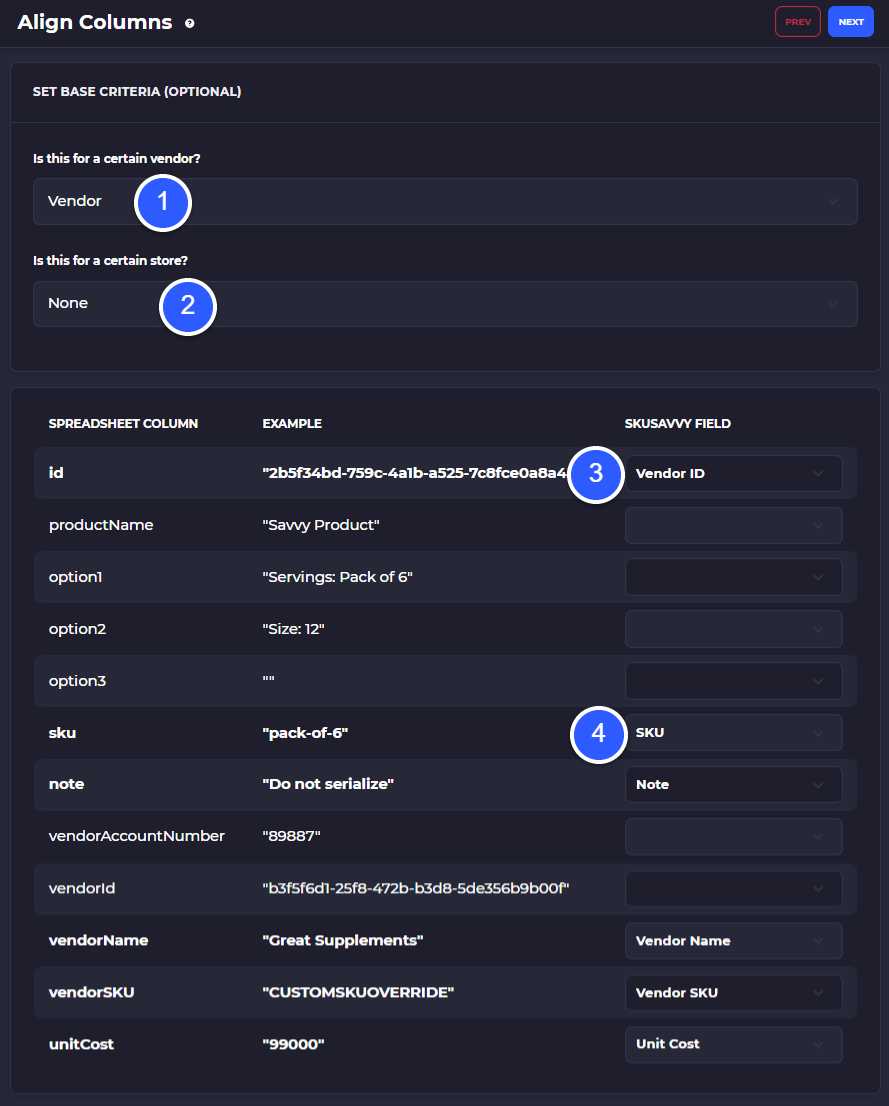
1) Select a specific vendor to import costs for
2) Select a specific Shopify store to import costs for
3) Map fields from your spreadsheet to the corresponding fields
4) Map all required fields
Tap 'Next'
Step 2: Confirm Data Import and Manually Update Data
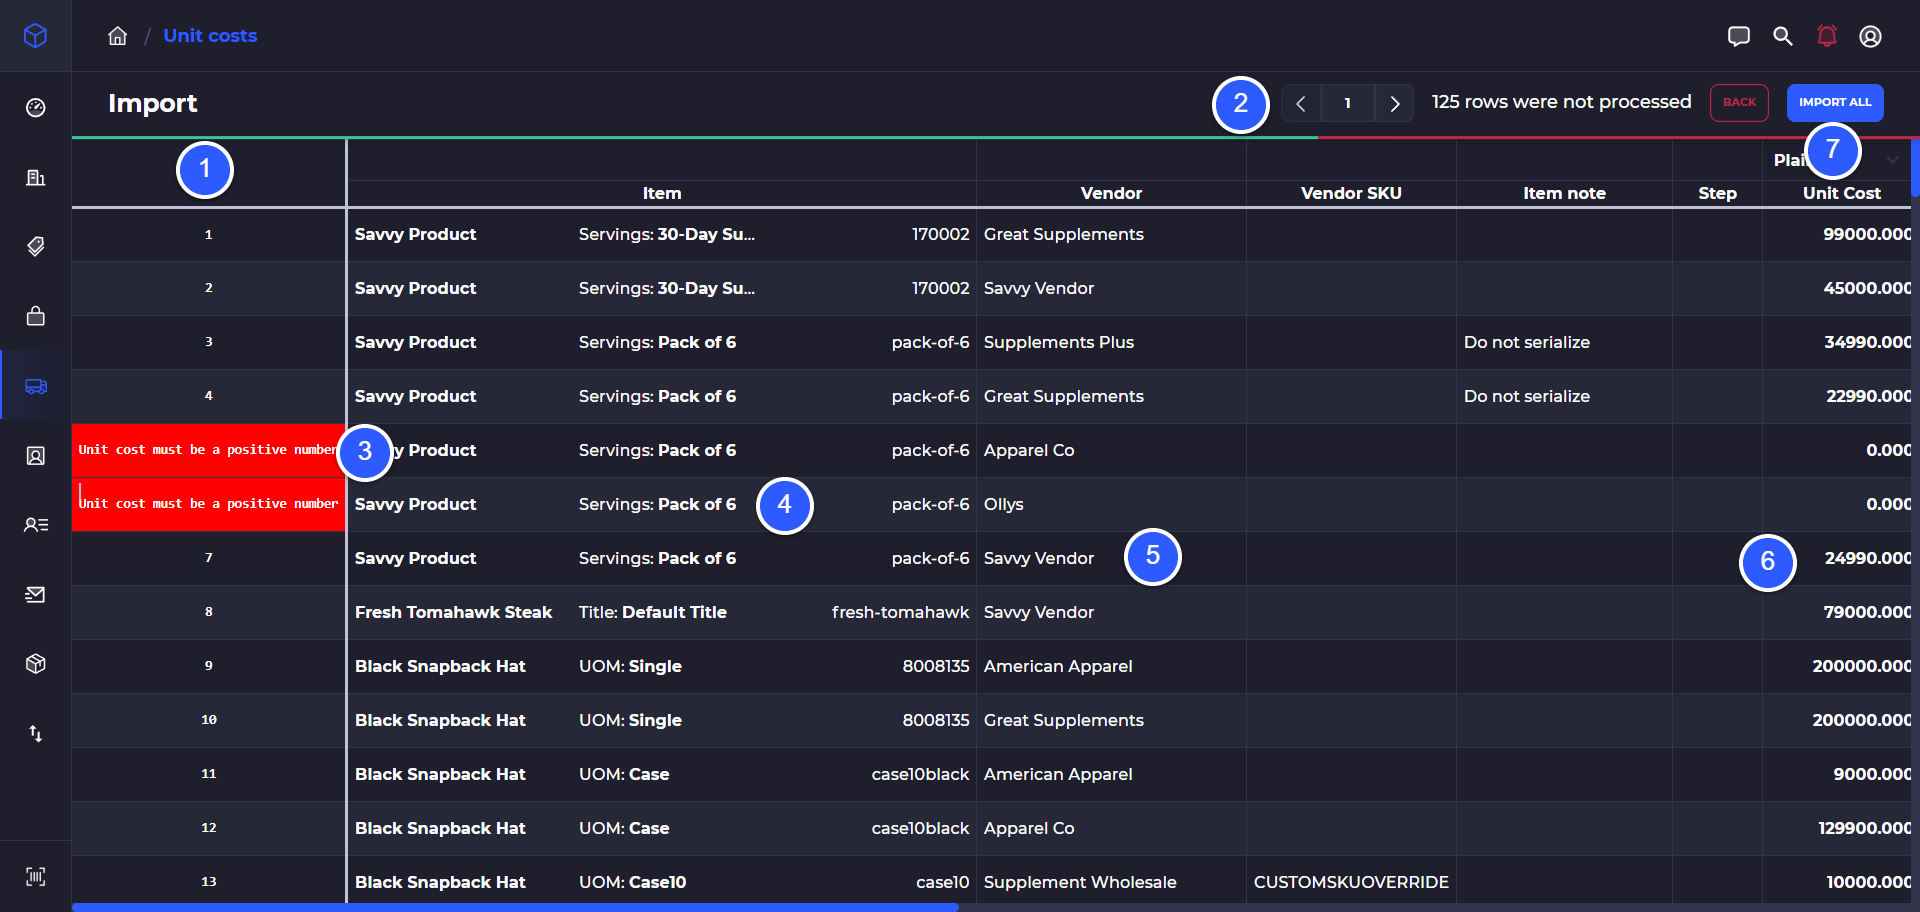
1) Row number with indicator that a row will not be imported and a reason
2) Page through the import and number of rows with errors
3) Indicator that the row has errors and cannot be imported
4) Manually select a product variant to override the suggested mapped data
5) Manually select a vendor to override existing mapping
6) Cost imported, shown in pennies with 3 decimal places
7) Confirm import
Min Max Par Value Import
With this import you can bring in new par values for your inventory items at a specific warehouse location. Par values are used in forecasting to determine how many units should be purchased or transferred from one location to another.
Data Fields
SKU (required) - the SKU for the item you want to import, used as a unique identifier for the item
Variant Barcode (optional) - the barcode for the product you are importing par values for
Variant ID (optional) - a unique identifier from SKUSavvy for the variant. Available from the cost export or directly in the SKUSavvy API
Min (required) - the minimum quantity you want to allow before SKUSavvy triggers a replenishment
Max (required) - the inventory amount you want to get back up to after an order or transfer arrives
Lead Time (optional) - the default amount of time it takes between the time you place an order and when the order comes in. Used in the forecasting suggestion. Calculated automatically as you use SKUSavvy to purchase inventory
Source - select whether you want the forecasting suggestions to only apply to POs or transfers. Valid options: POs or transfers