Pick to tote
Here's how you can use SKUSavvy to pick batches of orders and segment products picked into totes on a pick cart. This is your most efficient way to pick orders.
What is Pick to Tote?
In the context of order fulfillment operations, "pick to tote" is a picking method used in warehouses or distribution centers to efficiently pick multiple orders at once then assigning those items to a tote which represents a customer order. Here's how it works in SKUSavvy:
Tote Selection: In a pick to tote system, each batch is created by selecting the number of totes on a pick cart. Each tote is designated for a specific order in the batch and the orders are curated by the system then a batch is generated
Pick Tote Label: With a batch created and selected a picker scans the product then scans the tote to allocate the product to that tote with one tote being one order in the batch.
Order Information: Order pickers receive information about the items they need to pick, location of the items, and the quantities required for each order
Picking Process: Order pickers move through the warehouse to locate the items required for their assigned orders. Once an item is marked picked, the system indicates what quantity should be placed in each of the corresponding totes assigned to the batch. Pickers can optionally scan the item, then scan the tote directly
Efficiency: Pick to tote is designed to be an efficient picking method. It reduces the need for order pickers to constantly return to a central packing area to place items into individual orders. Instead, they pick items directly into the totes, and these totes can be scanned during fulfillment to bring up the order information for each package
Sorting and Packing: Once the order picker has completed picking for their assigned orders, the totes are often sorted or moved to a packing area. Here, the totes are scanned or selected with the system showing the appropriate customer order cartons or packages for shipping and items are emptied from the tote
The pick to tote method is particularly useful in high-volume order fulfillment environments where efficiency and accuracy are essential. It reduces travel time for order pickers and minimizes the risk of errors during order assembly. This method is commonly used in e-commerce warehouses and distribution centers to streamline the picking and packing process.
Initiate a Pick to Tote Batch
To kick off the pick to tote process, simply head into your order fulfillments, scroll to the batch creation (must have >1 open shipments) and click on 'Batch Shipments' similar to the existing batching workflow in SKUSavvy.
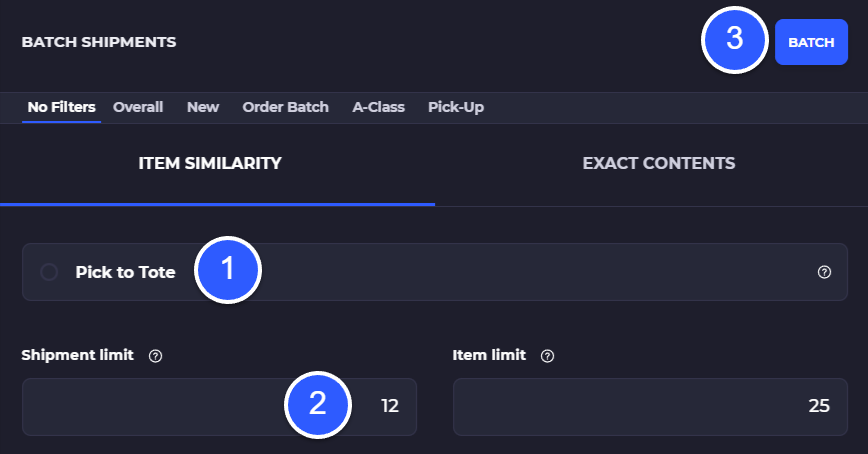
Once you've clicked into Batch Shipments you'll see an option at the top to 'Pick to Tote' which should be turned on, then you'll select the number of totes you are going to use in the batch.
Select 'Pick to Tote' as the batching option
Enter the number of totes you plan to use per batch (this will be one order per tote). SKUSavvy will create multiple batches if you have open order quantity greater than the shipment limit.
Click 'Batch' and SKUSavvy will auto-select the orders for the batch
Cart & Tote Barcode Setup
The first time you use pick to tote you will want to label your totes with barcodes if you plan on using barcode scanning functionality with this pick method.

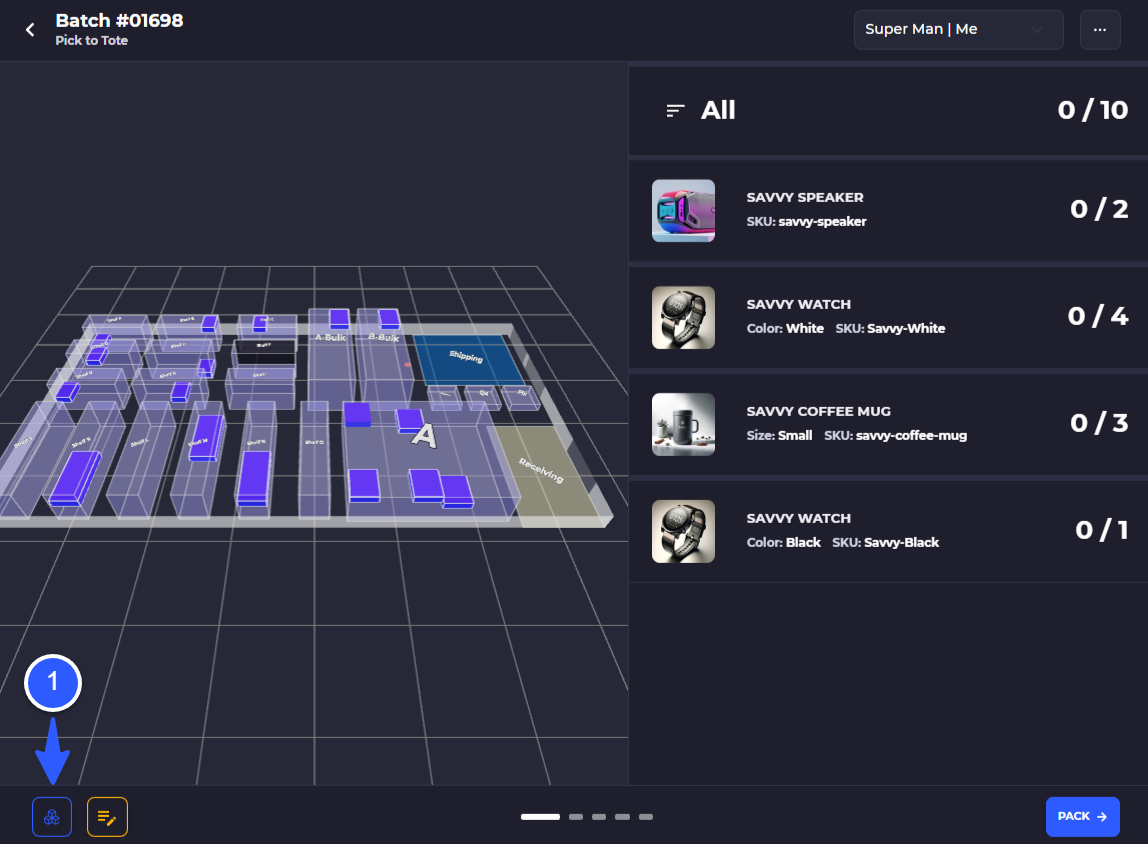
Click into a Pick to Tote Fulfillment Batch
When you click into a batch created with pick to tote you'll see it looks nearly identical to the regular batch picking screen. Simply start scanning (depending on the required bin/item scans) product then the system will indicate which tote to put them in.
Print Tote Batch (Cart) Barcode
If this is the FIRST time ever doing a pick to tote batch, click into the totes to print tote barcodes. You only need to print totes once. If you've already printed tote barcodes, then simply start scanning items and then scan them to the tote. Here you can print a batch barcode as well.
If you've previously printed a barcode at this step, it can be reused across different batches when the cart is empty. To print more totes, make larger batches, or print more tote barcodes on subsequent batches
Print a batch barcode (optionawhich can be scanned to access this exact batch you are on
Print the tote barcodes to enable scan to tote after a pick
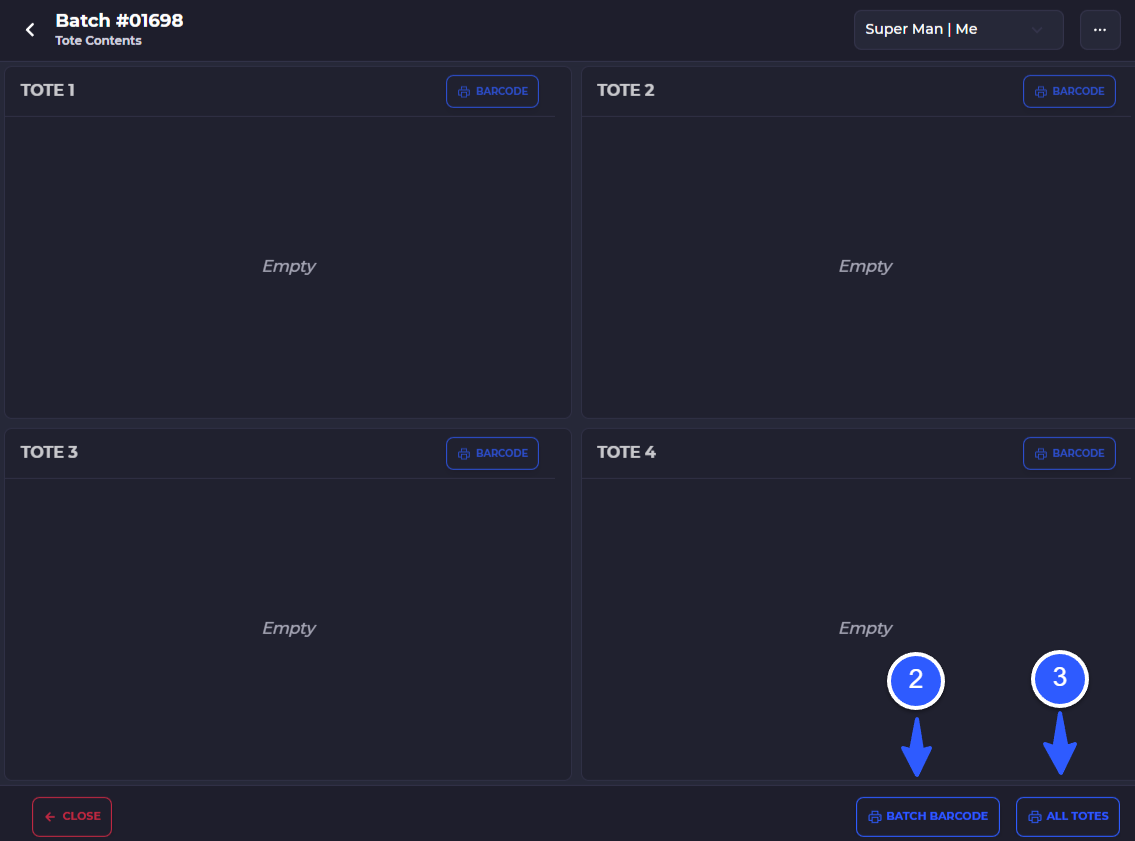
Cart barcodes can be reused infinitely across different pick-to-tote batches
Print Tote Barcodes
Once you click into a tote batch you can print all your tote barcodes for the batch. Tote barcodes are reusable and detected by the system then automatically assigned to the batch if you have them physically printed out on the tote already. Otherwise you will want to print tote barcodes out as you have totes being added to different pick carts.
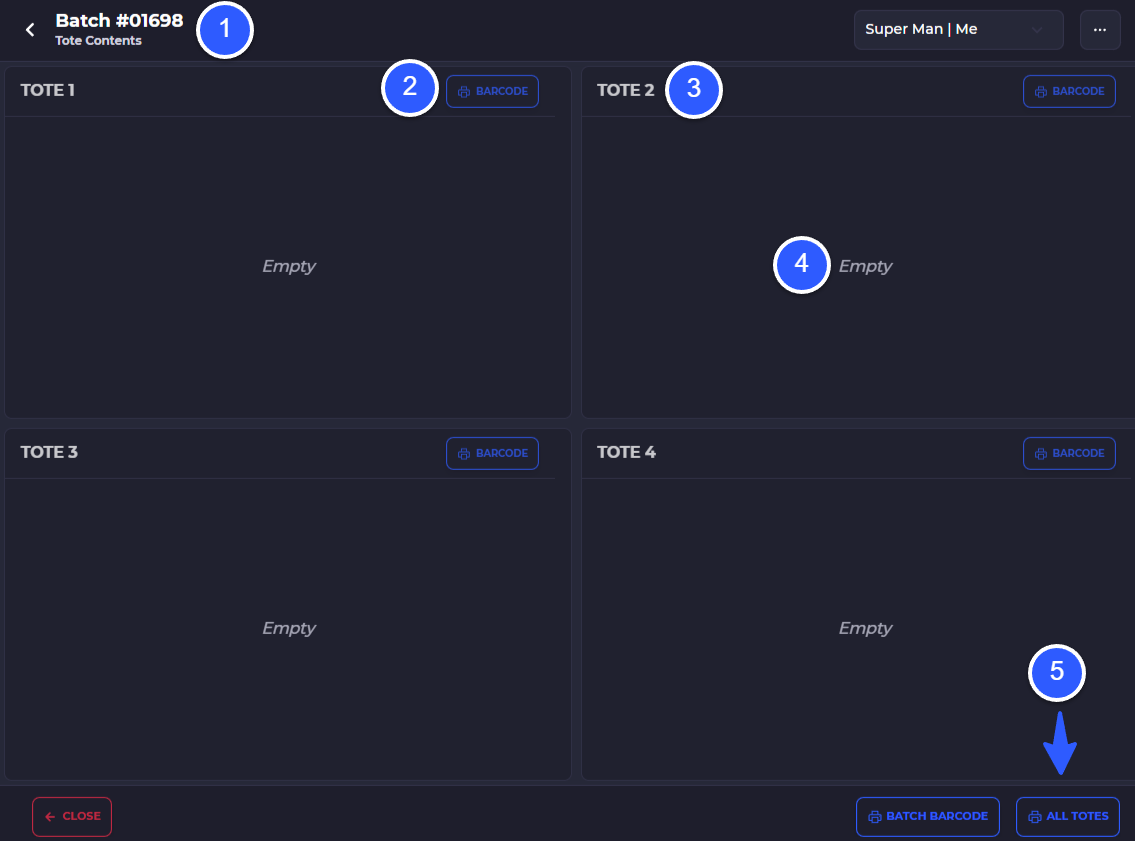
Indicates you are in a tote batch
Print a single tote barcode if not already printed
Pull up the 'Tote Contents' to print your generated tote labels
Tote number, click to go directly into this totes fulfillment (or you can scan it with a hardware scanner)
Indicates that the tote is empty, when you start scanning in product these will show here
Print all tote barcodes for the batch - once tote barcodes are printed and stuck to your totes, they can be reused for any future tote batch
In this stage there has not been any product allocated to the totes so tote contents are empty
Click the 3-dot batch menu to indicate how many columns your pick cart has

Pick to a Tote
Next up is to begin picking product and letting SKUSavvy work its magic to indicate which tote you should place product into. To start, go back into the pick screen for your pick to tote batch and pick as normal. You can of course also use barcode scanning for this.
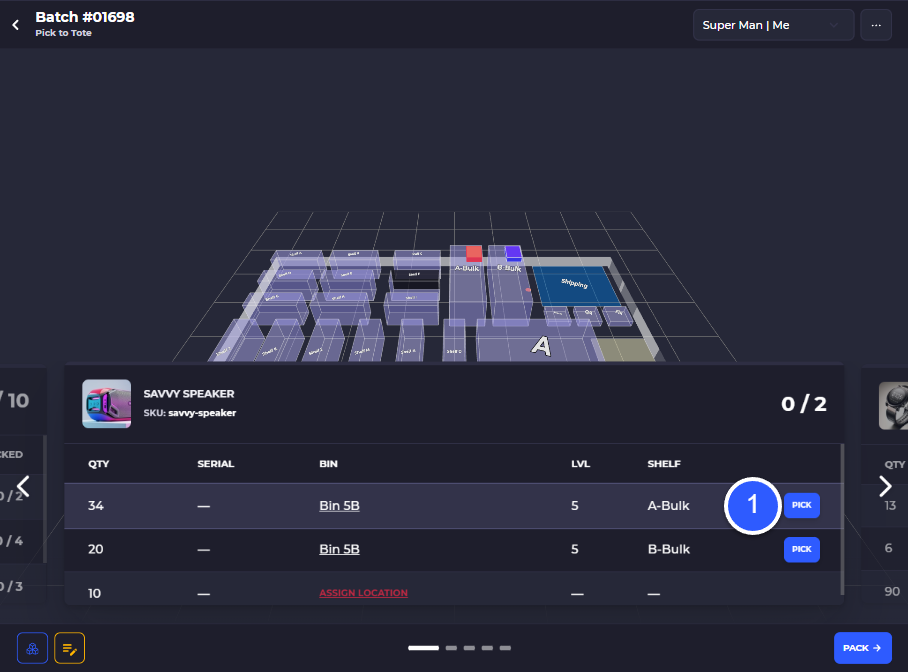
Pick or scan your products from the pick list as usual
Allocate items to your totes by tapping or if using a hardware scanner you can simply scan the product, then scan the tote to allocate automatically
The tote screen is shown as a side view of your pick cart and each tote is on its own row of the cart
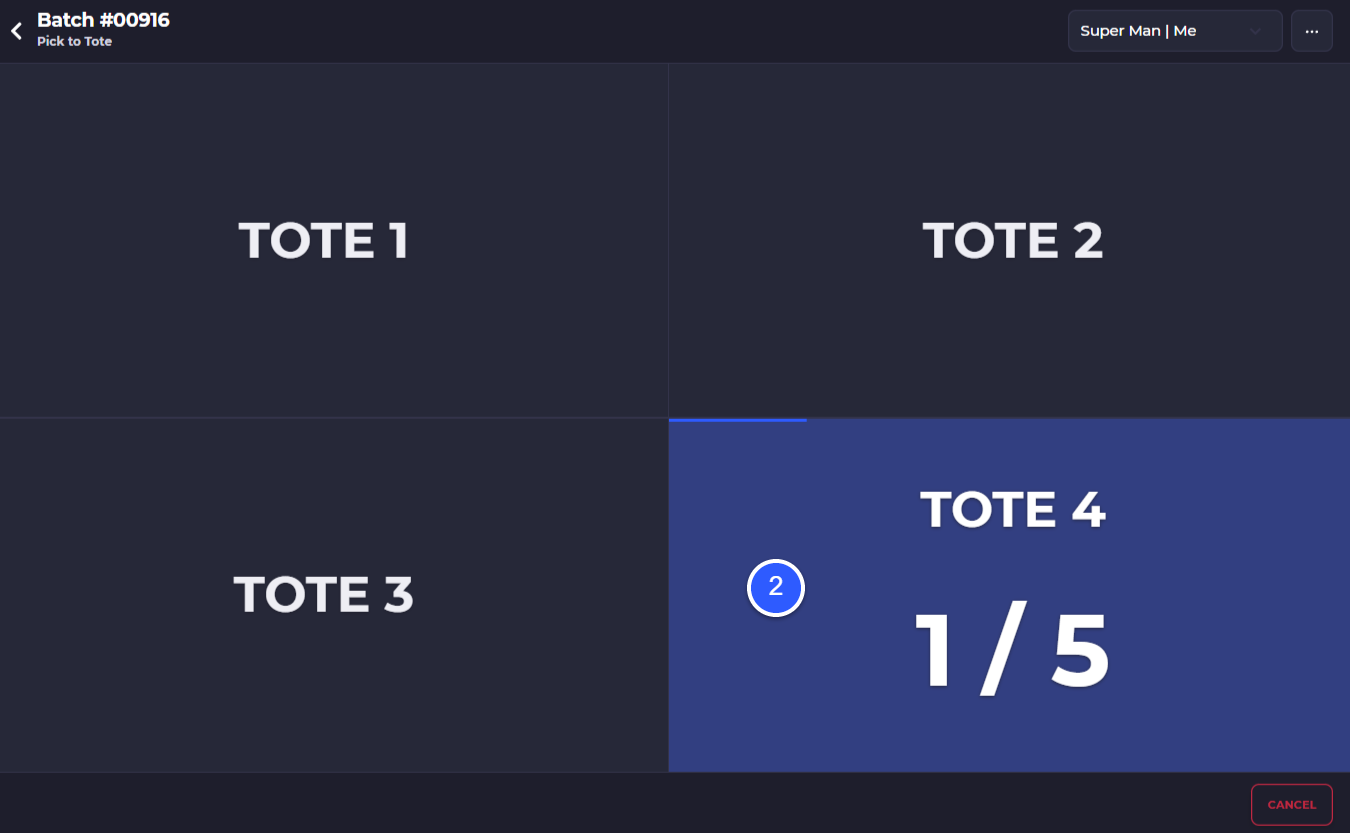
Shows where products has already been allocated to a tote via scan or tap
Indicates a different order/new tote to allocate additional quantity to
Commit what has already been placed in totes ignoring the rest of the currently picked quantity - this will allocate some quantity to the tote and take you back to the pick screen
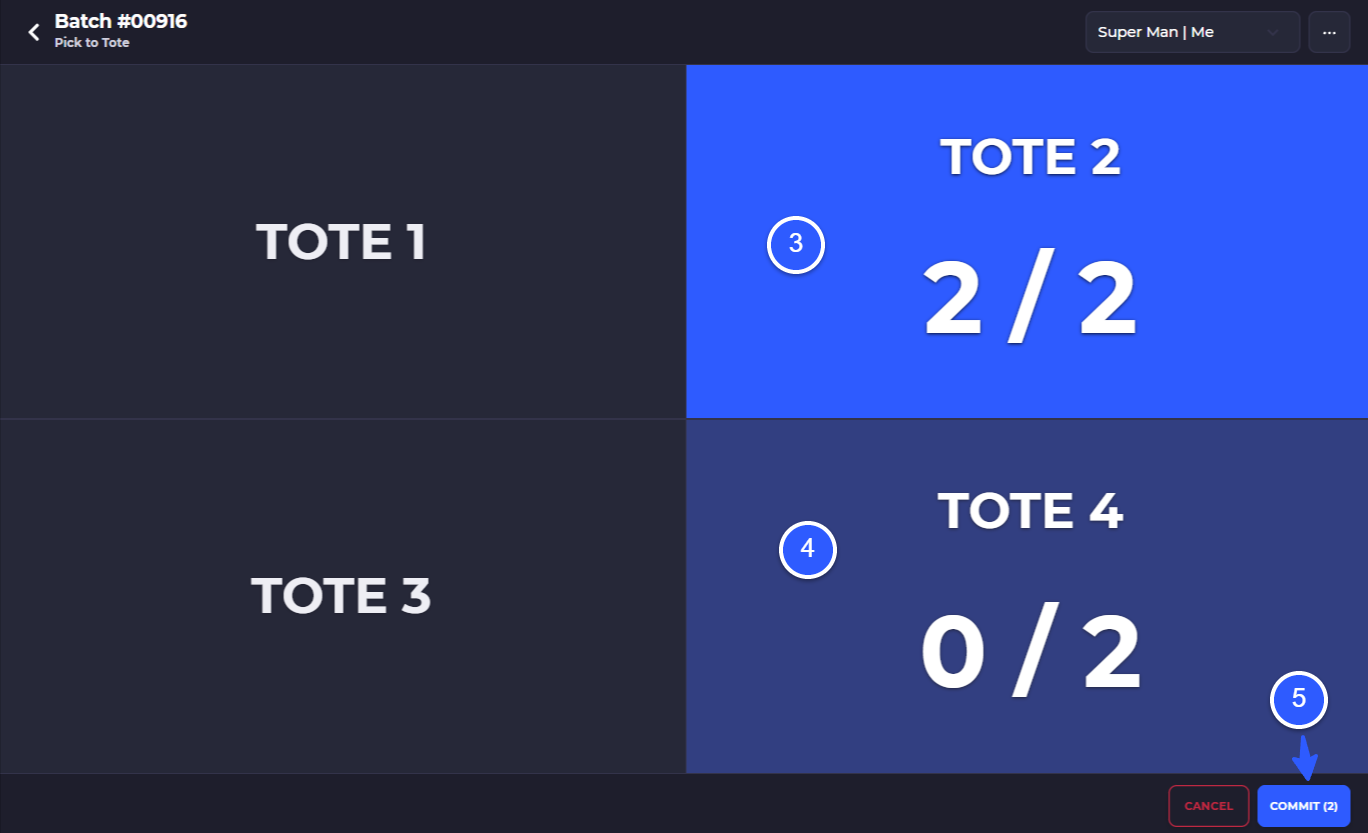
If you are using hardware barcode scanners, you can simply continue scanning items, then scan tote bins to allocate the quantity
View Pick Tote Contents
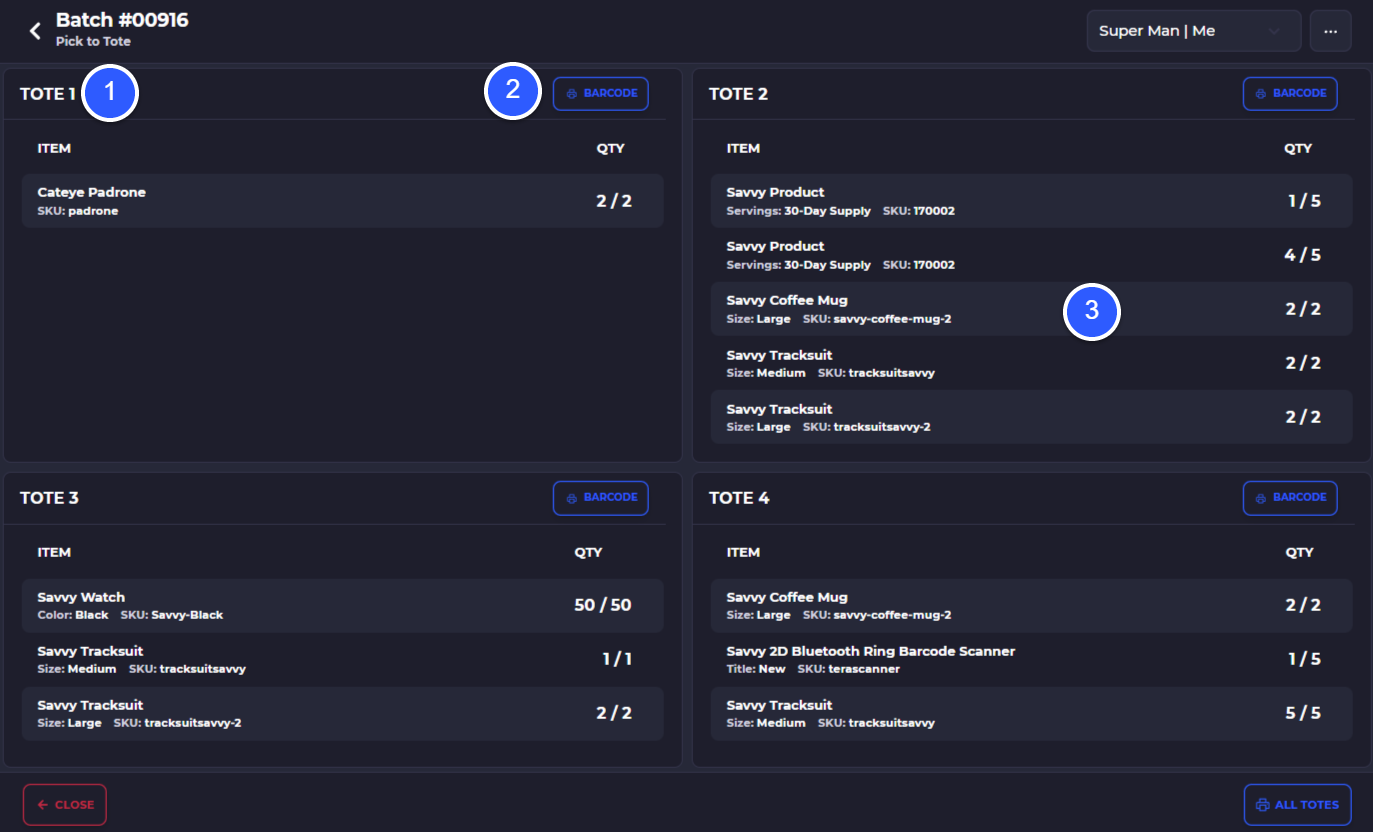
After you have started picking and allocating items to totes, SKUSavvy will provide a display of each tote and each of the contents in that tote. This can be viewed by clicking on the 'Tote Contents' button from the main pick screen.

The tote contents will show you each tote, and all current items that have been allocated to the tote. Remember, each tote is an order.
Order number, which is also the tote ID (barcode is separate
Print tote barcode
Contents of the tote
Unpick Tote Contents
Removing contents from a tote and placing back into a bin position is similar to the workflow of how you currently unpick, only now you will select which tote the contents are coming out of for any given item.

To start, simply select 'Unpick' on any of the contents you have already picked to a tote.
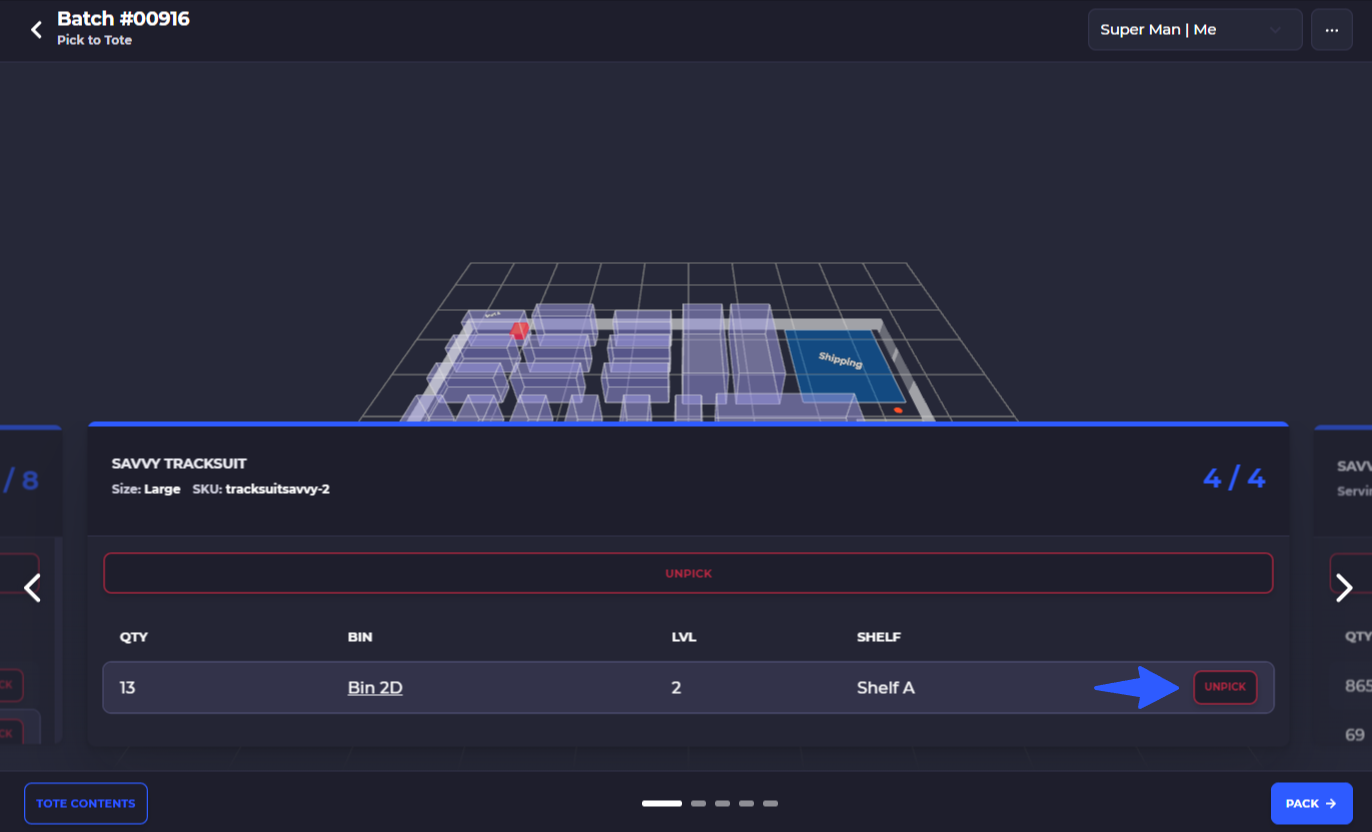
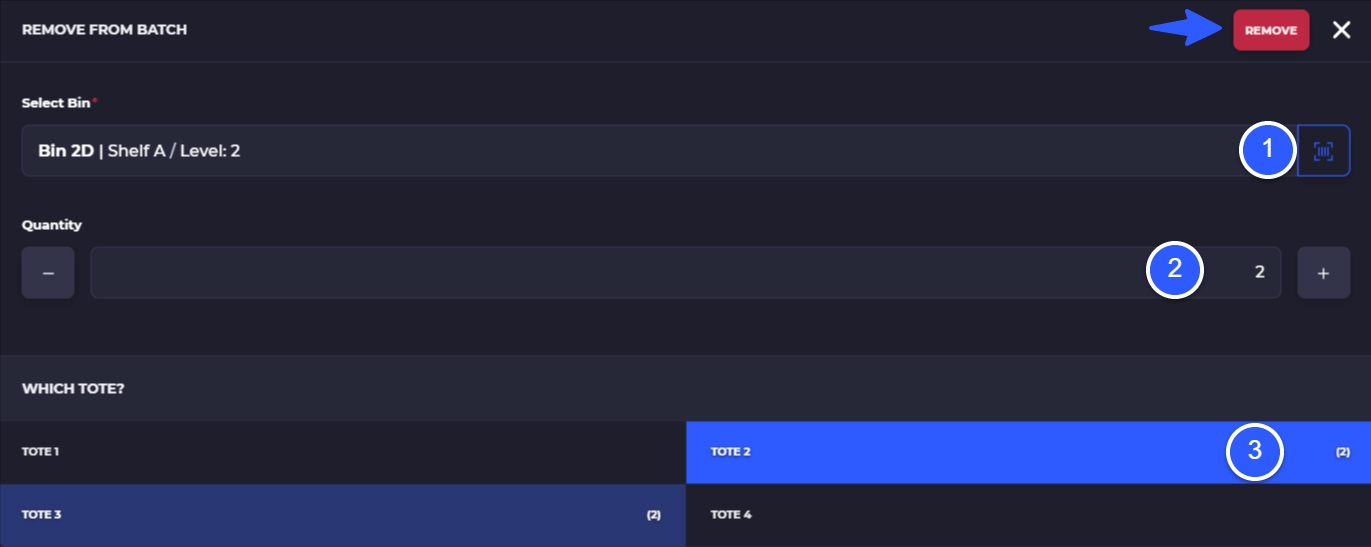
Next, you'll see that SKUSavvy highlights each of the tote locations the quantity was originally placed in. You can select which tote and what quantity you want to remove and put back into a bin location from here.
Select or scan the bin location to unpick back to - the bin you originally picked from is already selected by default
Quantity to unpick
Tote you are unpicking from, select one of the totes with quantity of this item to remove that totes quantity
Fulfill From a Tote
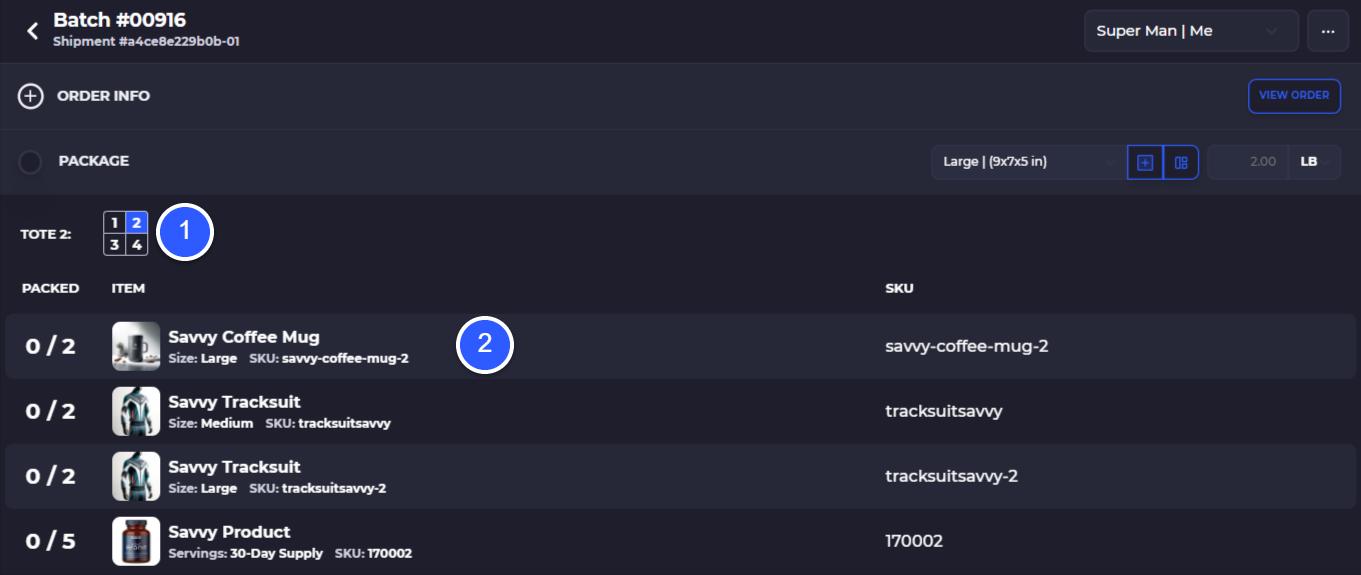
Once you have picked the items in a batch and allocated them to totes it's time to fulfill your orders from the totes. SKUSavvy will guide you through each order in the batch and understands which tote contains each order so you can simply scan the tote to begin fulfilling.
Fulfillment from a tote is identical to normal fulfillment without the tote system in place
Indicates which tote is being fulfilled, click on a tote to go to that fulfillment
Scan or tap the items in a tote to pack them
Get rates and fulfill your order
Understand Batching
This guide will help you understand how to batch your orders up based on your criteria
Understand Fulfillment
Here you can go through the picking and packing process outside of pick to tote functionality
Connect Carriers
How to connect your carrier accounts to pull rates during fulfillment
Hardware
See the suggested hardware to use with SKUSavvy
People Also Ask
What is “pick to tote” in SKUSavvy?
A multi-order picking method where each tote on a cart represents a customer order—built to cut travel and boost accuracy.
System creates a batch and assigns orders to totes
Pickers place items directly into the correct tote
Streamlines handoff to packing
How do I start a Pick-to-Tote batch?
Create a batch from Order Fulfillments, toggle Pick to Tote, and choose the number of totes to include in each batch created (one order per tote).
Requires >1 open shipments
SKUSavvy auto-selects orders for the batch
“Batch Shipments” flow mirrors standard batching
How do cart and tote barcodes work?
Label your pick cart and totes once, then reuse those barcodes across batches.
Assign/print a cart barcode; tie the batch to that cart
Print all tote barcodes for the batch in one action
Reusable barcodes speed repeat runs
How do I allocate picked items into totes?
Pick or scan the item, then allocate it to the right tote by tap or scan.
Side-by-side cart view shows each tote row
See where quantities have been placed
Commit partial quantities and return to pick list
Can I use hardware scanners for pick-to-tote?
Yes—scan the product, then scan the tote to auto-allocate quantity.
Works with handheld scanners
Optional; tap-to-allocate also supported
Reduces misallocation
Can I use pick-to-tote with Shopify?
By itself Shopify does not support pick to tote, however with SKUSavvy you can utilize pick to tote batching to efficiently pick and ship a high volume of orders.
Connect Shopify which pulls in orders to SKUSavvy
Batch Shopify orders selecting the number of totes
Pick orders to tote then fulfill
How do I view what’s inside each tote?
Open Tote Contents to see items currently allocated per tote/order.
Shows order/tote ID and contents
Quick link to print tote barcode
Ideal for mid-pick audits
Can I fix mistakes (unpick from a tote)?
Yes—use Unpick to remove items from a tote and put them back into a bin.
Choose bin (defaults to original pick bin)
Select quantity and tote to remove from
Keeps inventory accurate
How do I fulfill orders after pick-to-tote?
Scan or select a tote to launch that order’s pack/ship flow.
Pack items directly from the tote
Get rates and print labels
Works just like normal fulfillment
When is pick-to-tote most effective?
High-volume environments where you want minimal back-and-forth and fewer errors.
Less travel to a central pack area
Faster assembly of multi-order picks
Common in ecommerce DCs
Can I see a suggested pick route while using pick-to-tote?
Yes—use routing tools to set a start point, refine route settings, and show pick path for a visual guide.
Place start/end point near packing
View/debug the route and obstacles
Fine-tune time/resolution settings